🖥️ Can Hosting on the ICP be Easy as 1-2-3?
Use Our Tool & Deploy in Minutes!
I ran into SOOO many issues while learning to host websites on the ICP, despite being quite experienced in building & hosting traditional websites, so I decided to document everything I encountered and created this step-by-step tutorial & tool to make things easier for the next person (runs 100% inside your browser--no data collected).
Here's a Quick Visual Overview of the Process: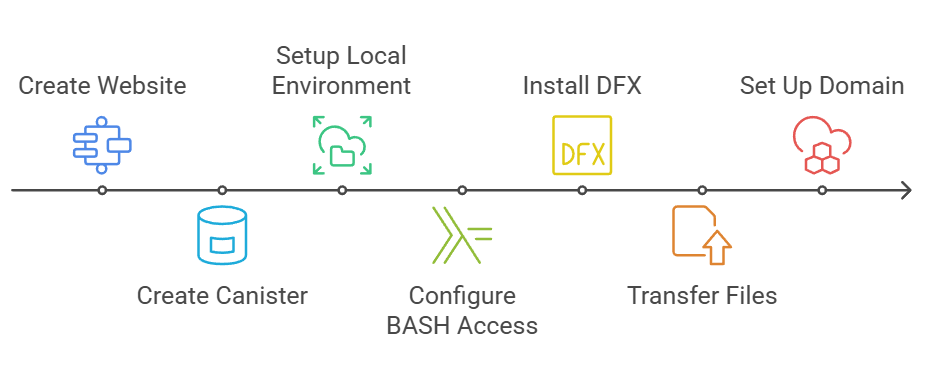
1) Create and save your working website files in a local folder (we will copy them to the correct location later). 2) Create a new canister on the ICP NNS. 3) Set up the local environment by creating necessary files and directories inside your project folder--use our tool below to do this correctly without any mistakes. 4) Configure Bash terminal access (if needed). Bash terminal is standard on MAC and installable on Windows through WSL (or GIT, etc.). 5) Download and install DFX from Dfinity (through your terminal) which is the tool for uploading your local web files to your canister on the ICP. 6) Transfer local project files to your ICP canister using DFX commands (a.k.a. deploy/upload). 7) Set up your custom domain name to connect to the canister with advanced DNS settings.
There will be a lot of little details involved, and we will cover everything step by step and help automate a lot of it for you!
📂 Step1: Let's Get Your Website Files Ready
Create your static website/webapp with HTML, your favorite WYSIWYG editor, or even with ChatGPT! Just make sure to have your web files tested locally and ready to go (html, image files, css, js, etc.). Make sure it is static, which means it doesn't require server-side backends/databases (Hint: Using js to call an API is considered static, as it doesn't need backend, and is very useful for building cool static websites or webapps on the ICP--just FYI).
♾️ Step 2: Create a Canister in Your ICP NNS
Navigate to https://nns.ic0.app and sign in with your Internet Identity. Create one now if you have not done so. Click the profile icon on the top right, go to "Canisters", create a new canister, and fund it with the required 2T cycles (barely a couple of dollars worth of ICP tokens), then make sure to copy the canister name & canister ID for the next step.
